

Photo by Christian Wiediger on Unsplash
From Configuration to Automated Testing: A Comprehensive Guide to File Uploads with Amazon S3 and MinIO SDK in Go


Overview
In the world of cloud storage, Amazon S3 stands out as a robust and reliable solution for storing and managing files. However, configuring an S3 account for file uploads can be tricky, especially for developers new to the AWS ecosystem. In this blog post, we'll walk you through the process of configuring your S3 account, building a Go application to upload files using Command Line Interface, and leveraging the MinIO SDK to streamline file uploads to both S3 and MinIO servers. Additionally, we'll explore how the MinIO SDK enables automated testing using the Testcontainers library, allowing you to validate your file upload functionality with ease.
AWS S3 configuration

To start uploading files to Amazon Web Storage (AWS) S3, we need an AWS account. AWS offers a Free Tier that includes limited access to Amazon S3 for new AWS customers. The Free Tier allows you to use certain AWS services, including Amazon S3, within specified usage limits at no additional cost for the first 12 months after signing up for an AWS account.
Sign in to the AWS Management Console
Sign in to your AWS account or create a new one if you don't have an account yet.
Navigate to Amazon S3
Once logged in, you'll land on the AWS Management Console dashboard.
Use the search bar at the top of the page or navigate to the "Storage" section and click on "S3" to open the Amazon S3 console.

Create a Bucket in AWS S3
Amazon S3 buckets provide a highly scalable, durable, and cost-effective solution for storing and managing data in the cloud. In the Amazon S3 console, click on the "Create bucket" button. Enter a unique name for your bucket. Bucket names must be globally unique across all of Amazon S3. Click "Create bucket" to create your bucket.

Create a User in AWS IAM
Navigate to the IAM service from the AWS Management Console.

Create User. In the IAM dashboard, click on "Users" in the left navigation pane. Click on the "Add user" button to start the user creation process. Enter

Set Permissions. For our needs, we must give S3 access permission (
AmazonS3FullAccess) to the user.
Create an Access Key and Secret Key for "Programmatic access".

Download generated credentials. This pair of Access Key and Secret Key will be used by a software application in the authentication process to upload files to the corresponding AWS account.

Upload files to AWS S3 using the MinIO client

MinIO is an open-source, high-performance, object storage server that is compatible with AWS S3. It is designed for cloud-native and containerized environments, offering scalable and resilient storage infrastructure for modern applications. MinIO implements the S3 API, making it compatible with existing S3 tools, libraries, and applications. You can use the MinIO client library to interact with both MinIO servers and S3-compatible storage services. This allows you to seamlessly switch between MinIO and S3 environments based on your needs, without changing your application code. MinIO's compatibility with the S3 API makes it a great choice for integration testing. We will exploit this feature in the next section when setting up integration tests.
We use a MinIO client from minio-go library to implement a simple file uploader (MinIO provides client implementations in several languages other than Go).
// internal/uploader.go
package internal

import (
    "context"
    "fmt"
    "path/filepath"

    "github.com/minio/minio-go/v7"
)

// Uploader defines the interface for uploading files.
type Uploader interface {
    UploadFile(bucketName, objectName, filePath string) error
}

// MinIOUploader implements the Uploader interface for MinIO.
type MinIOUploader struct {
    Client *minio.Client
}

// UploadFile uploads a file to the specified MinIO bucket.
func (u *MinIOUploader) UploadFile(
    ctx context.Context, bucketName string, filePath string,
) error {
    objectName := filepath.Base(filePath)
    _, err := u.Client.FPutObject(
        ctx,
        bucketName,
        objectName,
        filePath,
        minio.PutObjectOptions{},
    )
    if err != nil {
        return fmt.Errorf("failed to upload file: %w", err)
    }
    return nil
}
The API of our uploader is straightforward: we need to pass filePath to the file we want to upload, and the bucketName that determines the bucket in S3 storage.
To simplify the upload process's manual testing, we provide a command-line application implemented using the Cobra package. Cobra is a robust framework with features such as command routing, flag parsing, and interactive help generation. We expose in the CLI (Command Line Interface) the possibility to pass S3 credentials, bucket name, and file path to the file we want to upload.
// cmd/main.go
package main

import (
    "context"
    "log"
    "os"

    "amazon-s3-uploader/internal"

    "github.com/minio/minio-go/v7"
    "github.com/minio/minio-go/v7/pkg/credentials"
    "github.com/spf13/cobra"
)

type UploadSpec struct {
    accessKey  string
    secretKey  string
    bucketName string
    fileName   string
}

func main() {
    rootCmd := newRootCmd()
    if err := rootCmd.Execute(); err != nil {
        os.Exit(1)
    }
}

func newRootCmd() *cobra.Command {
    cmd := &cobra.Command{
        Use: "uploader",
    }

    cmd.AddCommand(
        uploadCmd(),
    )
    return cmd
}

func uploadCmd() *cobra.Command {
    var fileName string
    var bucketName string
    var accessKey string
    var secretKey string
    cmd := &cobra.Command{
        Use:   "upload",
        Short: "upload file to s3 bucket",
        RunE: func(cmd *cobra.Command, args []string) error {
            fileName, err := cmd.Flags().GetString("filename")
            if err != nil {
                return err
            }
            bucketName, err := cmd.Flags().GetString("bucket")
            if err != nil {
                return err
            }
            accessKey, err := cmd.Flags().GetString("accesskey")
            if err != nil {
                return err
            }
            secretKey, err := cmd.Flags().GetString("secretkey")
            if err != nil {
                return err
            }
            return upload(UploadSpec{
                fileName:   fileName,
                bucketName: bucketName,
                accessKey:  accessKey,
                secretKey:  secretKey,
            })
        },
    }
    cmd.PersistentFlags().StringVarP(
        &fileName, "filename", "f", "", "Full file path to resource",
    )
    cmd.MarkPersistentFlagRequired("filename")
    cmd.PersistentFlags().StringVarP(
        &accessKey, "accesskey", "a", "", "Amazon S3 Access Key",
    )
    cmd.MarkPersistentFlagRequired("accesskey")
    cmd.PersistentFlags().StringVarP(
        &secretKey, "secretkey", "x", "", "Amazon S3 Secret Key",
    )
    cmd.MarkPersistentFlagRequired("secretkey")
    cmd.PersistentFlags().StringVarP(
        &bucketName, "bucket", "b", "", "Amazon S3 Bucket Name",
    )
    cmd.MarkPersistentFlagRequired("bucket")
    return cmd
}

func upload(spec UploadSpec) error {
    endpoint := "s3.amazonaws.com"

    s3Client, err := minio.New(
        endpoint,
        &minio.Options{
            Secure: true,
            Creds: credentials.NewStaticV4(
                spec.accessKey, spec.secretKey, "",
            ),
        },
    )
    if err != nil {
        return err
    }
    s3Uploader := &internal.MinIOUploader{Client: s3Client}

    err = s3Uploader.UploadFile(
        context.Background(), spec.bucketName, spec.fileName,
    )
    if err != nil {
        return err
    }

    log.Printf(
        "Upload of: %s to bucket: %s success",
        spec.fileName,
        spec.bucketName,
    )
    return nil
}
Now we can use it as follows:
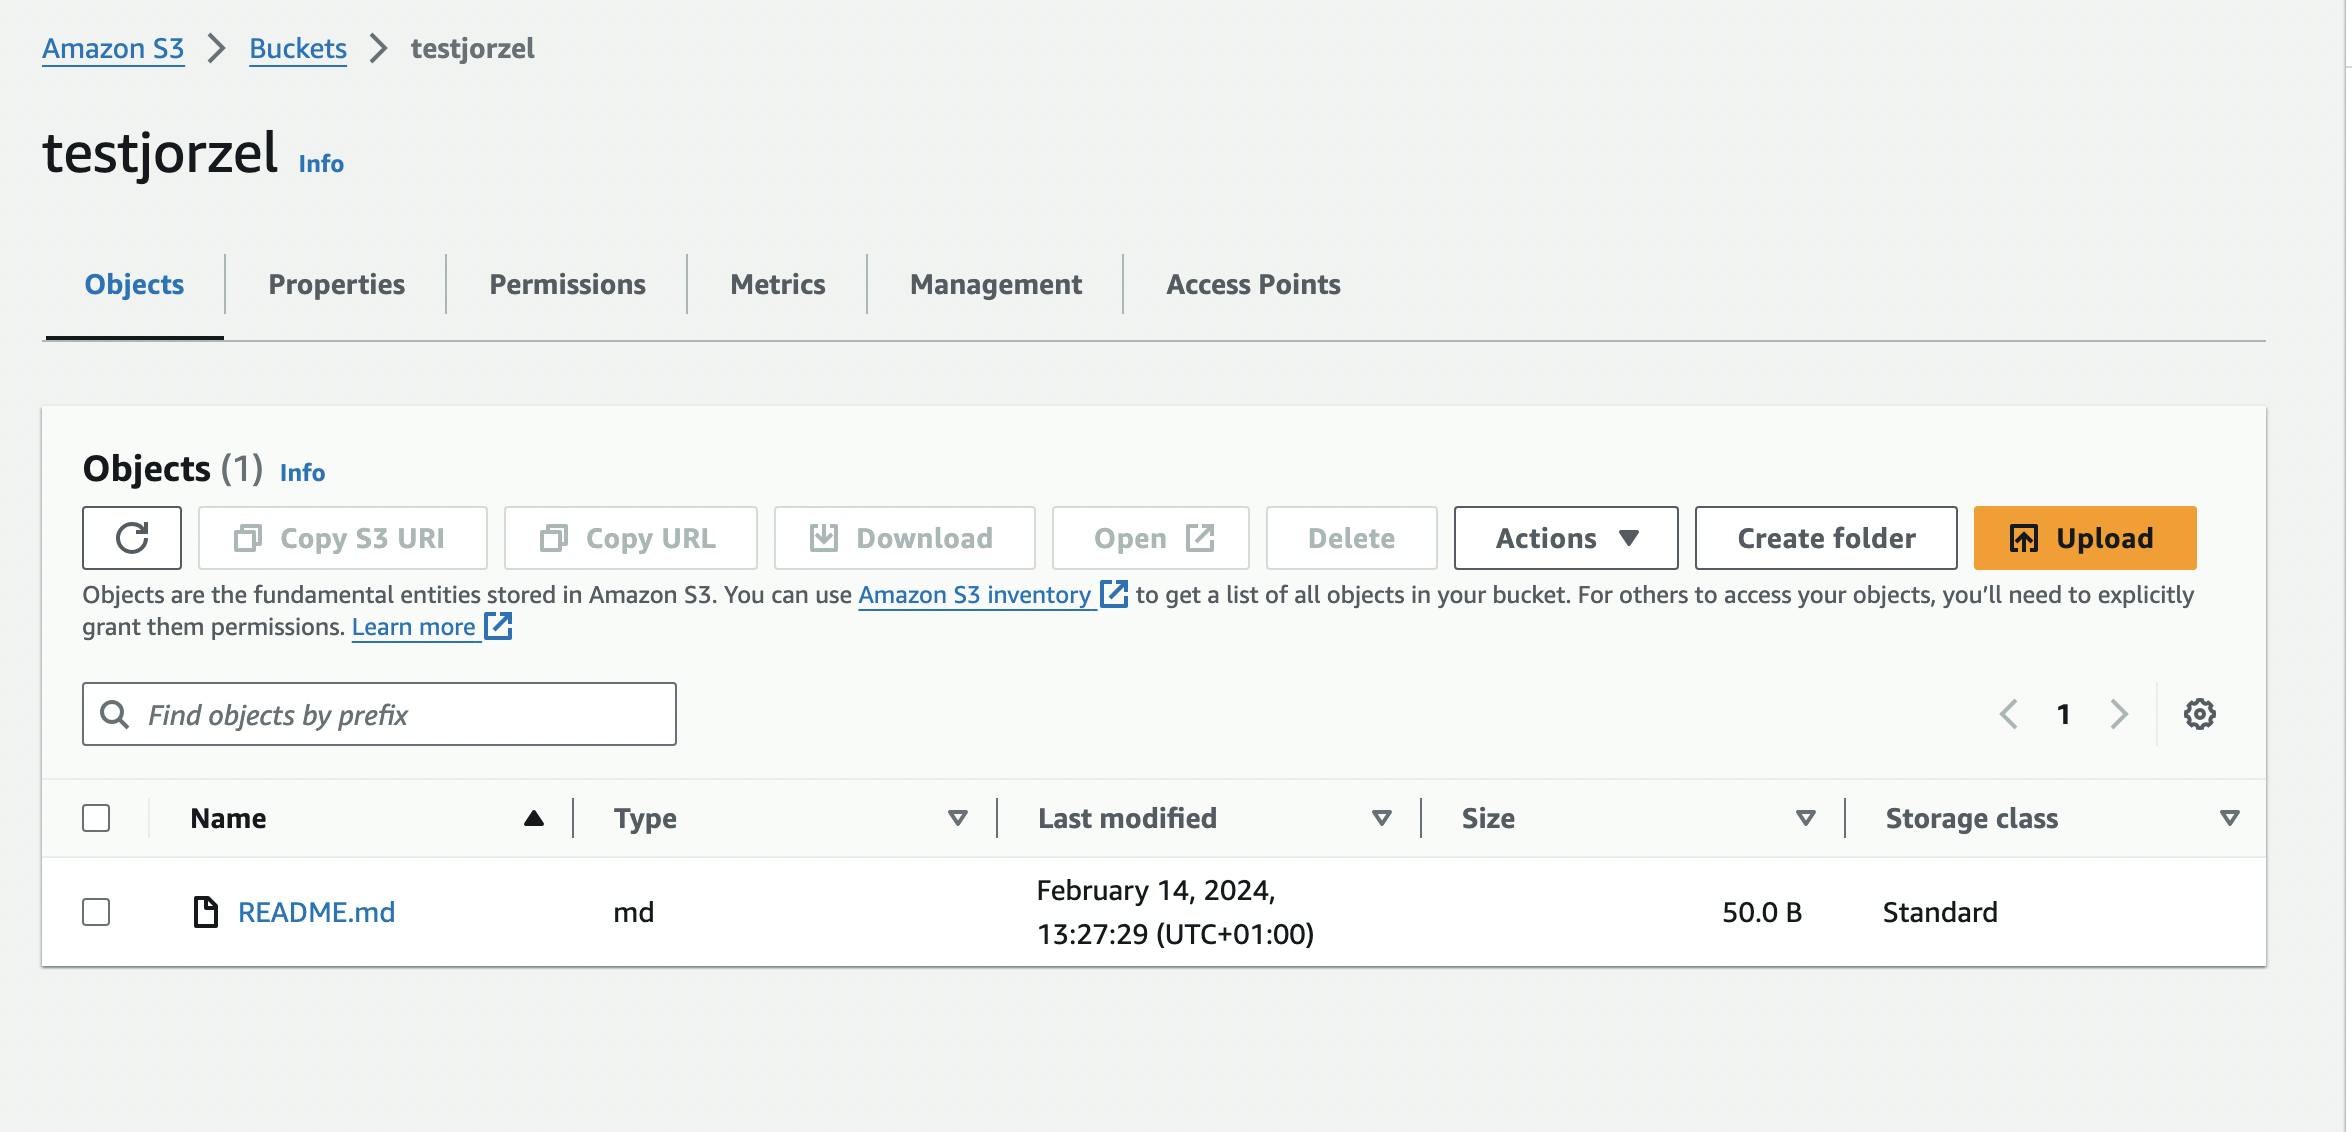
$ go run ./cmd/main.go upload -b testjorzel -f ./README.md -a youraccesskey -x yoursecretkey
2024/02/14 13:27:28 Upload of: ./README.md to bucket: testjorzel success
We can check in our AWS S3 dashboard whether the file landed in the bucket.
Our manual testing process passed. In the next section, I want to show how to automate testing using the Testcontianers library.
Integration tests with Testcontainers library
![]()
Testing file upload functionality is crucial for ensuring the reliability and stability of your applications. However, performing manual tests after each change in the code could be daunting. Testcontainers is a library commonly used in software development for creating and managing disposable containers (like Docker containers) during testing. It's handy for integration testing where an application needs to interact with external dependencies such as databases, message brokers, or other services. Instead of setting up these services manually, Testcontainers allows developers to define these dependencies in their test code, ensuring a consistent and reproducible testing environment. This helps in writing tests that closely resemble real-world scenarios without the complexity of maintaining separate test infrastructure.
We use testcontainers-go library to spin up a MinIO server instance in a containerized environment during tests (you need a Docker-API compatible container runtime installed on your host), allowing us to test the application's integration with S3-compatible storage in a controlled and reproducible manner.
package internal

import (
    "context"
    "os"
    "path/filepath"
    "testing"

    "github.com/minio/minio-go/v7"
    "github.com/minio/minio-go/v7/pkg/credentials"
    "github.com/stretchr/testify/require"
    "github.com/testcontainers/testcontainers-go"
    "github.com/testcontainers/testcontainers-go/wait"
)

func TestUploaderWithMinioServer(t *testing.T) {
    ctx := context.Background()

    accessKey := "testAccessKey"
    secretKey := "testSecretKey"
    bucketName := "testbucket"

    minioServer, err := startMinioServer(ctx, accessKey, secretKey)
    require.NoError(t, err)
    defer terminateMinioServer(ctx, minioServer)

    // setup MinIO endpoint for uploading
    endpoint, err := minioServer.Endpoint(ctx, "")
    if err != nil {
        t.Fatal("cannot setup minio endpoint: %w", err)
    }
    minioClient, err := minio.New(
        endpoint,
        &minio.Options{
            Secure: false,
            Creds:  credentials.NewStaticV4(accessKey, secretKey, ""),
        },
    )
    if err != nil {
        t.Fatal("cannot initialize minio client: %w", err)
    }

    // create bucket for files in MinIO
    err = minioClient.MakeBucket(
        ctx, bucketName, minio.MakeBucketOptions{},
    )
    if err != nil {
        t.Fatal("cannot create minio bucket: %w", err)
    }
    fileName := "test.png"
    basePath := t.TempDir()
    filePath := filepath.Join(basePath, fileName)
    createFile(t, filePath)
    uploader := MinIOUploader{Client: minioClient}

    err = uploader.UploadFile(ctx, bucketName, filePath)
    require.NoError(t, err)

    // check whether file exists in MinIO storage
    _, err = minioClient.StatObject(
        ctx, bucketName, fileName, minio.StatObjectOptions{},
    )
    require.NoError(t, err)

}

func startMinioServer(
    ctx context.Context, accessKey string, secretKey string,
) (testcontainers.Container, error) {
    req := testcontainers.ContainerRequest{
        Env: map[string]string{
            "MINIO_ACCESS_KEY": accessKey,
            "MINIO_SECRET_KEY": secretKey,
        },
        Image: "minio/minio",

        ExposedPorts: []string{"9000/tcp"},
        WaitingFor:   wait.ForHTTP("/minio/health/live").WithPort("9000"),
        Cmd:          []string{"server", "/data"},
    }
    return testcontainers.GenericContainer(
        ctx, testcontainers.GenericContainerRequest{
            ContainerRequest: req,
            Started:          true,
        },
    )
}

func terminateMinioServer(ctx context.Context, container testcontainers.Container) error {
    return container.Terminate(ctx)
}

func createFile(t *testing.T, filePath string) *os.File {
    t.Helper()
    fp, err := os.Create(filePath)
    if err != nil {
        t.Fatalf("add file(%q): %s", filePath, err)
    }
    return fp
}
Our test:
starts
minioServercontainer with uploadingendpointexposed,creates
minioClient(with bucket) that usesendpointto connect with the server,injects
minioClienttoMinIOUploader,uploads a file using
MinIOUploaderto the given bucket,checks using
StatObjectmethod whether the uploaded file exists on theminioServer,
Here we have integration test logs where we see that the test has passed and also the MinIO container start time and termination time.
$ go test ./... -v
?       amazon-s3-uploader/cmd    [no test files]
=== RUN   TestUploaderWithMinioServer
2024/02/15 15:03:32 github.com/testcontainers/testcontainers-go - Connected to docker:
  Server Version: 20.10.21
  API Version: 1.41
  Operating System: Docker Desktop
  Total Memory: 11963 MB
  Resolved Docker Host: unix:///var/run/docker.sock
  Resolved Docker Socket Path: /var/run/docker.sock
  Test SessionID: 18566b9e8681660d9ccbef9491b6fe255a54d514c14bdd5d188d9b975740b635
  Test ProcessID: 6488454d-b2b0-427d-8c5b-c913808596b3
2024/02/15 15:03:32 🐳 Creating container for image testcontainers/ryuk:0.6.0
2024/02/15 15:03:32 ✅ Container created: 8a9d90a29af5
2024/02/15 15:03:32 🐳 Starting container: 8a9d90a29af5
2024/02/15 15:03:33 ✅ Container started: 8a9d90a29af5
2024/02/15 15:03:33 🚧 Waiting for container id 8a9d90a29af5 image: testcontainers/ryuk:0.6.0. Waiting for: &{Port:8080/tcp timeout:<nil> PollInterval:100ms}
2024/02/15 15:03:33 🔔 Container is ready: 8a9d90a29af5
2024/02/15 15:03:33 🐳 Creating container for image minio/minio
2024/02/15 15:03:33 ✅ Container created: a8cd27a10df4
2024/02/15 15:03:33 🐳 Starting container: a8cd27a10df4
2024/02/15 15:03:33 ✅ Container started: a8cd27a10df4
2024/02/15 15:03:33 🚧 Waiting for container id a8cd27a10df4 image: minio/minio. Waiting for: &{timeout:<nil> Port:9000 Path:/minio/health/live StatusCodeMatcher:0x102bcda00 ResponseMatcher:0x102c9af50 UseTLS:false AllowInsecure:false TLSConfig:<nil> Method:GET Body:<nil> PollInterval:100ms UserInfo: ForceIPv4LocalHost:false}
2024/02/15 15:03:33 🔔 Container is ready: a8cd27a10df4
2024/02/15 15:03:33 🐳 Terminating container: a8cd27a10df4
2024/02/15 15:03:34 🚫 Container terminated: a8cd27a10df4
--- PASS: TestUploaderWithMinioServer (2.04s)
PASS
Conclusion
With just a few configuration changes, you can seamlessly switch between different storage environments, whether it's S3 in production or a MinIO server for testing and development purposes. This versatility not only simplifies your development and testing workflows but also ensures consistency and compatibility across different environments.
The full codebase covering the topic of this post can be found in the Github repo.