

A few days ago I started my journey with Kubernetes. I would like to share how you can take the first steps with this complex tool and not feel overwhelmed.
In this post, I will discuss:
what is Kubernetes and why do we need it all
how Kubernetes architecture looks like
how to set up a local playground for Kubernetes
what is an imperative and declarative configuration styles
how to deploy a simple web application and expose it for external access
How to easily scale up or down an application
So let's start.
"You teach best what you most need to learn"
R. Bach
What is Kubernetes and when do we need it?
Kubernetes is an open-source container orchestration platform that automates application deployment and management processes.
Limitations of an application deployed using a Docker Compose mechanism can illustrate to us why we can need an orchestrator. Docker Compose is a tool used for configuring multiple containers in the same host. The problems arise when we want our system to be deployed on several servers to scale it up or provide more resilience (e.g. avoid downtime when our server is down). Of course, we can deploy Docker Compose with our application on a few different servers. However, none of these applications knows about each other, so we do not have any coordination of this distributed system. We cannot also scale it up or down automatically in reaction to incoming traffic. Besides, each rollout of the application results in system downtime.
The above issues indicate areas where an orchestrator can be a solution. Here are some features of orchestrators like Kubernetes:
It manages a container lifecycle (create/restart/deploy).
It is responsible for finding available resources or a server (a node in a multiple-nodes cluster) to create and run a container.
It deploys and load balance applications across multiple servers (to avoid a single point of failure, e.g. downtime due to problems with one of the nodes).
it auto-scales the application (add/remove instances) to handle variance in traffic.
it rolls out application changes without disrupting the user experience. It can deploy a new version of the application incrementally, replacing instances one by one.
The main conclusion is that Kubernetes can be extremely useful when scalability and high availability of a system are crucial demands.
Kubernetes architecture
Kubernetes is usually run on several nodes (to provide resilience and availability as we see in the previous section) that create a cluster. A node is a physical or virtual machine that has Kubernetes installed on it. There are two types of a node:
master node (control plane)
worker node
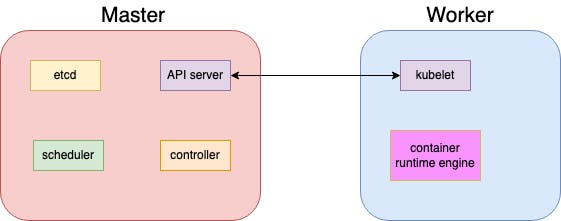
In a production-ready environment, containers are deployed only to worker nodes. The master node watches over the worker nodes and is responsible for container orchestration in the nodes. It consists of:
API server- enables communication with worker nodesetcd- a key-value store for all cluster datascheduler- distributes containers to the worker nodescontroller- a brain of the orchestration process
A worker node is a server where containers are run. It has a kublet that provides a communication path with the master node. It must also have a container runtime engine that runs containers on a host operating system (e.g. docker).
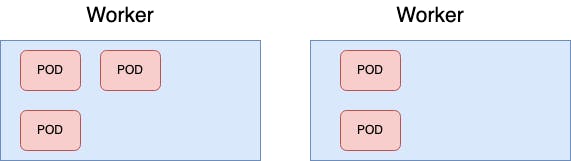
Kubernetes does not deploy containers directly to the worker nodes. It encloses containers into objects called pods. A pod is a minimal deployable object in Kubernetes and can be seen as a container from a runtime perspective.
Local Kubernetes environment
When I first considered familiarizing myself with Kubernetes I thought that I must have access to heavy infrastructure resources (like AWS, Azure, or GCP cloud) to test my configuration. So, to learn Kubernetes I probably need some money to pay for cloud receipt. However, it is not true. You can play with Kubernetes for free using tools that set up lightweight Kubernetes implementation by creating a VM (Virtual Machine) on your local machine and deploying a simple cluster containing only one Kubernetes node. I will present how to do it using Docker Desktop (but you can also choose the Minikube or other available option):
Download Docker Desktop compatible with your local machine OS.
Install and start Docker Desktop following the instructions (this link is for macOS, please choose the installation tips from the sidebar that meet your OS requirements).
Go to
Preferences->Kubernetesand checkEnable Kubernetes.
Thanks to it, you should have installed kubectl CLI tool and have set up a single-node Kubernetes cluster. To check it out you can type in the terminal: kubectl get nodes. You should get something like that:
$ kubectl get nodes
NAME             STATUS   ROLES           AGE   VERSION
docker-desktop   Ready    control-plane   17d   v1.25.2
We have a Kubernetes playground ready. It is a single node (the control plane and worker node in the same node), so we cannot exploit all Kubernetes features but for training purposes, it is a powerful enough tool.
Now, we can deploy and manage a simple application to test how it works. But before we do it, we must figure out how to manage objects using Kubernetes.
Kubernetes configuration
Kubernetes provides two ways of object configuration: imperative and declarative. The imperative style of managing Kubernetes is about directly specifying in the command line what exactly should be done (here you have a helpful cheatsheet for commands), e.g. run a container by creating a new pod:
$ kubectl run nginx-pod --image=nginx:latest
pod/nginx-pod created
The declarative style uses manifests. A manifest is an object definition file (usually written in yaml) that specifies the state we want to apply in the cluster.
# nginx-pod.yml
apiVersion: v1
kind: Pod
metadata:
  name: nginx-pod
spec:
  containers:
    - name: nginx-container
      image: nginx
We can describe the high-level structure of a manifest:
apiVersion- API version dedicated to given object kind (could be different for various objects)kind- a type of object (e.g.Pod,Service,Deployment, etc.)metadata- additional properties of an object (e.g.name)spec- the most important part of the file, where we define an object's behavior. This section's structure differs between various types of objects.
Command line kubectl apply can be used to execute a provided manifest file:
$ kubectl apply -f nginx-pod.yml
pod/nginx-pod created
The imperative style is straightforward, so it is a good idea for starters. However, the declarative one exposes the real power of Kubernetes: automation, versioning, and complex configuration.
Running an application
Now, we would like to run an application using Kubernetes. We try to focus on Kubernetes here, so our application would be as simple as possible. It would be a kind of "hello world" that was written using Python Flask framework. The only functionality of the application is returning a hardcoded string on / HTTP endpoint:
# hello.py
from flask import Flask

app = Flask(__name__)

@app.route("/")
def up():
    return "I am running!"
To run an application using Kubernetes we need to have it containerized.
First, we define a Dockerfile.
FROM python:alpine
COPY hello.py /
RUN pip install flask
ENV FLASK_APP=/hello.py
CMD ["flask", "run", "-h", "0.0.0.0", "-p", "8000"]
Now we can build a container image:
$ docker build -t hello:v1 .
To check whether the image was built properly, we run it using docker run command (with a forwarded port 5000->8000).
$ docker run -p 5000:8000 hello:v1
 * Serving Flask app '/hello.py'
 * Debug mode: off
WARNING: This is a development server. Do not use it in a production deployment. Use a production WSGI server instead.
 * Running on all addresses (0.0.0.0)
 * Running on http://127.0.0.1:8000
 * Running on http://172.17.0.2:8000
Our application should be accessible from a browser at: http://127.0.0.1:5000:
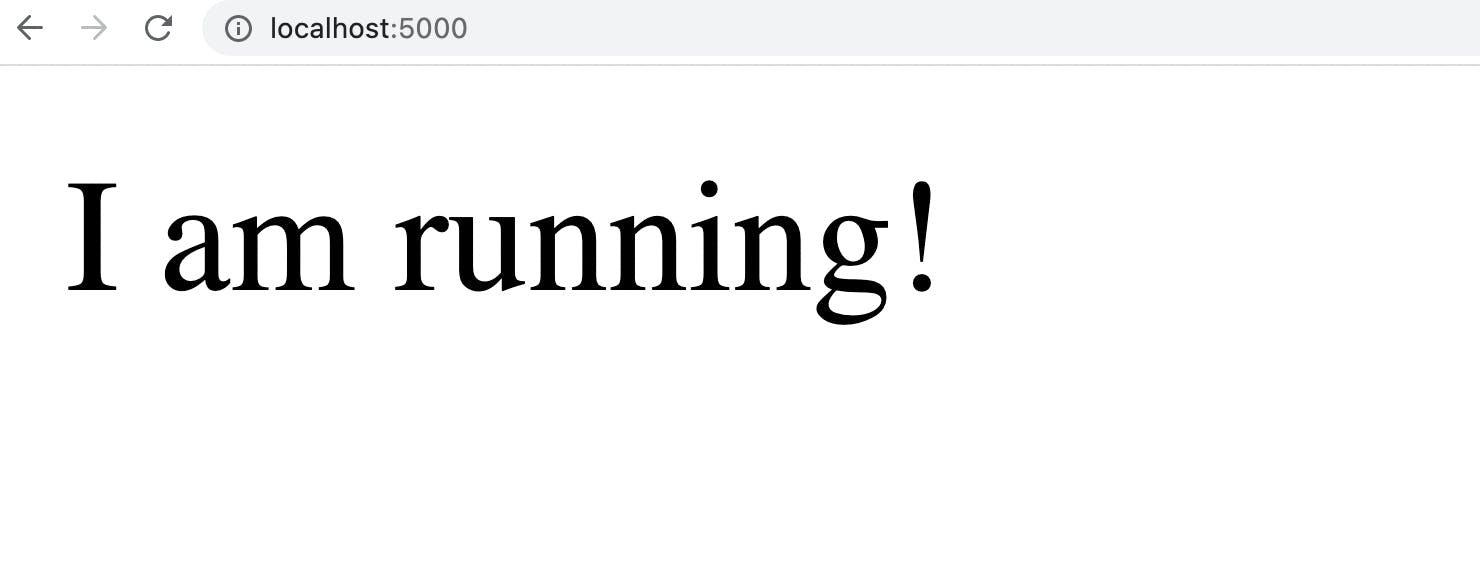
Great! It works.
However, it was done using only Docker. Now, I would like to reproduce it using Kubernetes. The simplest way to do it is by imperatively creating a pod and forwarding a port to expose the pod to the external world:
$ kubectl run hello-pod --image hello:v1
$ kubectl port-forward hello-pod 5000:8000
Forwarding from 127.0.0.1:5000 -> 8000
Forwarding from [::1]:5000 -> 8000
We can check that our pod is running:
$ kubectl get pods
NAME                       READY   STATUS    RESTARTS        AGE
hello-pod                  1/1     Running   0               6m37s
There is a command kubectl describe in Kubernetes that shows the state and configuration of the existing object in detail:
$ kubectl describe pod hello-pod
Even if we created an object using the imperative command, we can easily obtain a manifest file for it by executing the following operation:
$ kubectl get pod hello-pod -o yaml > hello-pod.yml
At the very end, we can check whether our application is accessible from a browser.

Scaling up the application
The above example shows how to run an application in a single replica. To demonstrate the scaling feature, we need a little bit more sophisticated setup than two commands imperatively executed in CLI. We must introduce two new object types:
Deploymentthat enables deploying more than one replica of an application and also upgrading the application without downtime (thanks to the rolling update strategy)Servicethat exposes a set of pods to the external world.
First, we need to define a manifest for our Deployment object.
# hello-deployment.yml
apiVersion: apps/v1
kind: Deployment
metadata:
  name: hello-deployment
spec:
  template:
    metadata:
      name: hello-pod
      labels:
        app: hello
    spec:
      containers:
        - name: hello-container
          image: hello:v1
  replicas: 2
  strategy:
    type: RollingUpdate
  selector:
    matchLabels:
      app: hello
In the template section we place a definition of our pod. We also specified a strategy RollingUpdate to replace application instances one by one during the update. The desired number replicas is 2. The selector section provides a set of labels to identify the pod (from the template section).
Now we can apply our configuration and investigate our cluster state.
$ kubectl apply -f hello-deployment.yml
deployment.apps/hello-deployment created
$ kubectl get deployment hello-deployment
NAME               READY   UP-TO-DATE   AVAILABLE   AGE
hello-deployment   2/2     2            2           2m39s
$ kubectl get pods
NAME                                READY   STATUS    RESTARTS      AGE
hello-deployment-698bc87c8d-bmpjv   1/1     Running   0             5s
hello-deployment-698bc87c8d-lhfd7   1/1     Running   0             6s
Our deployment is running successfully, all two pods are ready and running. To expose our deployment to the external world we can define an Service object using NodePort type.
# hello-service.yml
apiVersion: v1
kind: Service
metadata:
name: hello-service
spec:
type: NodePort
ports:
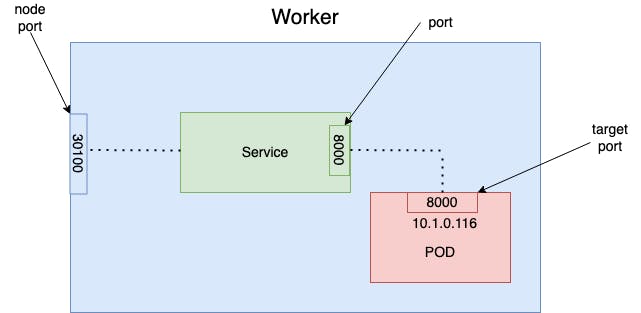
- targetPort: 8000
port: 8000
nodePort: 30100
selector:
app: hello
We can now create a service and verify that it is running properly.
$ kubectl apply -f hello-service.yml
service/hello-service created
$ kubectl get service hello-service
NAME            TYPE       CLUSTER-IP       EXTERNAL-IP   PORT(S)          AGE
hello-service   NodePort   10.111.172.133   <none>        8000:30100/TCP   15m
Only port property is mandatory, if we do not specify targetPort it is assumed to be the same value as port. If we do not specify nodePort it will take any available value from the range 30000-32767. Maybe the following picture lets us better understand the above configuration.
Our application is accessible now on http://127.0.0.1:30100.

The last thing I would like to show is how to scale up the application, e.g. from 2 to 6 replicas. I make a modification in a deployment manifest (increase replicas field value to 6) and apply changes.
$ kubectl apply -f hello-deployment.yml
deployment.apps/hello-deployment configured
$ kubectl get deployment hello-deployment
NAME               READY   UP-TO-DATE   AVAILABLE   AGE
hello-deployment   6/6     6            6           45m
$ kubectl get pods
NAME                                READY   STATUS    RESTARTS      AGE
hello-deployment-698bc87c8d-5b6df   1/1     Running   0             42s
hello-deployment-698bc87c8d-bmpjv   1/1     Running   0             43m
hello-deployment-698bc87c8d-l98bt   1/1     Running   0             42s
hello-deployment-698bc87c8d-lhfd7   1/1     Running   0             43m
hello-deployment-698bc87c8d-p4t62   1/1     Running   0             42s
hello-deployment-698bc87c8d-plh7v   1/1     Running   0             42s
It is working, 6/6 pods are ready and running :) Great! That's all.
Conclusion
By learning Kubernetes, you can gain skills that are in high demand and improve your ability to manage and deploy applications in a scalable and efficient way. Additionally, it can be beneficial in terms of career advancement, as many companies are now using or planning to use Kubernetes in their infrastructure.
In this post, I discussed some Kubernetes internals and showed basic examples of usage. It probably does not cover even a small percentage of what Kubernetes offer. However, I strongly believe that it can give you the ability to make a first step - maybe not the most difficult one, but definitely the most important one.