How to utilize Amazon S3 presigned URLs

Overview
Storing blob objects securely is crucial, and AWS S3 provides an excellent solution for it. Its user-friendly SDK, available in multiple languages, simplifies uploading and downloading files. However, there are instances where accessing sensitive account credentials poses a challenge. In such scenarios, presigned URLs emerge as a valuable solution. They offer a means to access AWS S3 bucket resources temporarily, eliminating the need for secret keys to be directly embedded. These URLs facilitate secure and temporary access, ensuring data integrity without compromising security.
In this post, I aim to demonstrate the use of presigned URLs for uploading and downloading files, empowering you to utilize AWS S3 effectively while maintaining data security practices.
Use cases
Here are several use cases where presigned URLs can be utilized.
Download Link with Temporary Access: Presigned GET URLs can be generated to provide temporary access to download a specific file from an S3 bucket. This allows you to securely share files with others without exposing your AWS credentials.
Upload Link with Temporary Slot: Similarly, presigned PUT URLs can be used to provide temporary access for uploading a file to an S3 bucket. This enables users to securely upload a file to your bucket without requiring direct access to your AWS credentials.
Virtual Machine Security: Presigned POST policy can be injected into virtual machines on startup to enable the secure upload of multiple files to an S3 bucket under specified conditions. This approach enhances security by ensuring that sensitive AWS credentials are not stored on the virtual machine itself.
Direct File Upload from HTML Form: Presigned POST policy can also be injected into HTML forms to allow direct file uploads to an S3 bucket without the need for a backend server as a proxy. This simplifies the upload process and reduces server-side processing.
AWS S3 presigned URLs provide a way to upload single or multiple files using PUT or POST policy. It is not possible to create a policy that permits the download of numerous files. If so, we have to create multiple presigned GET URLs.
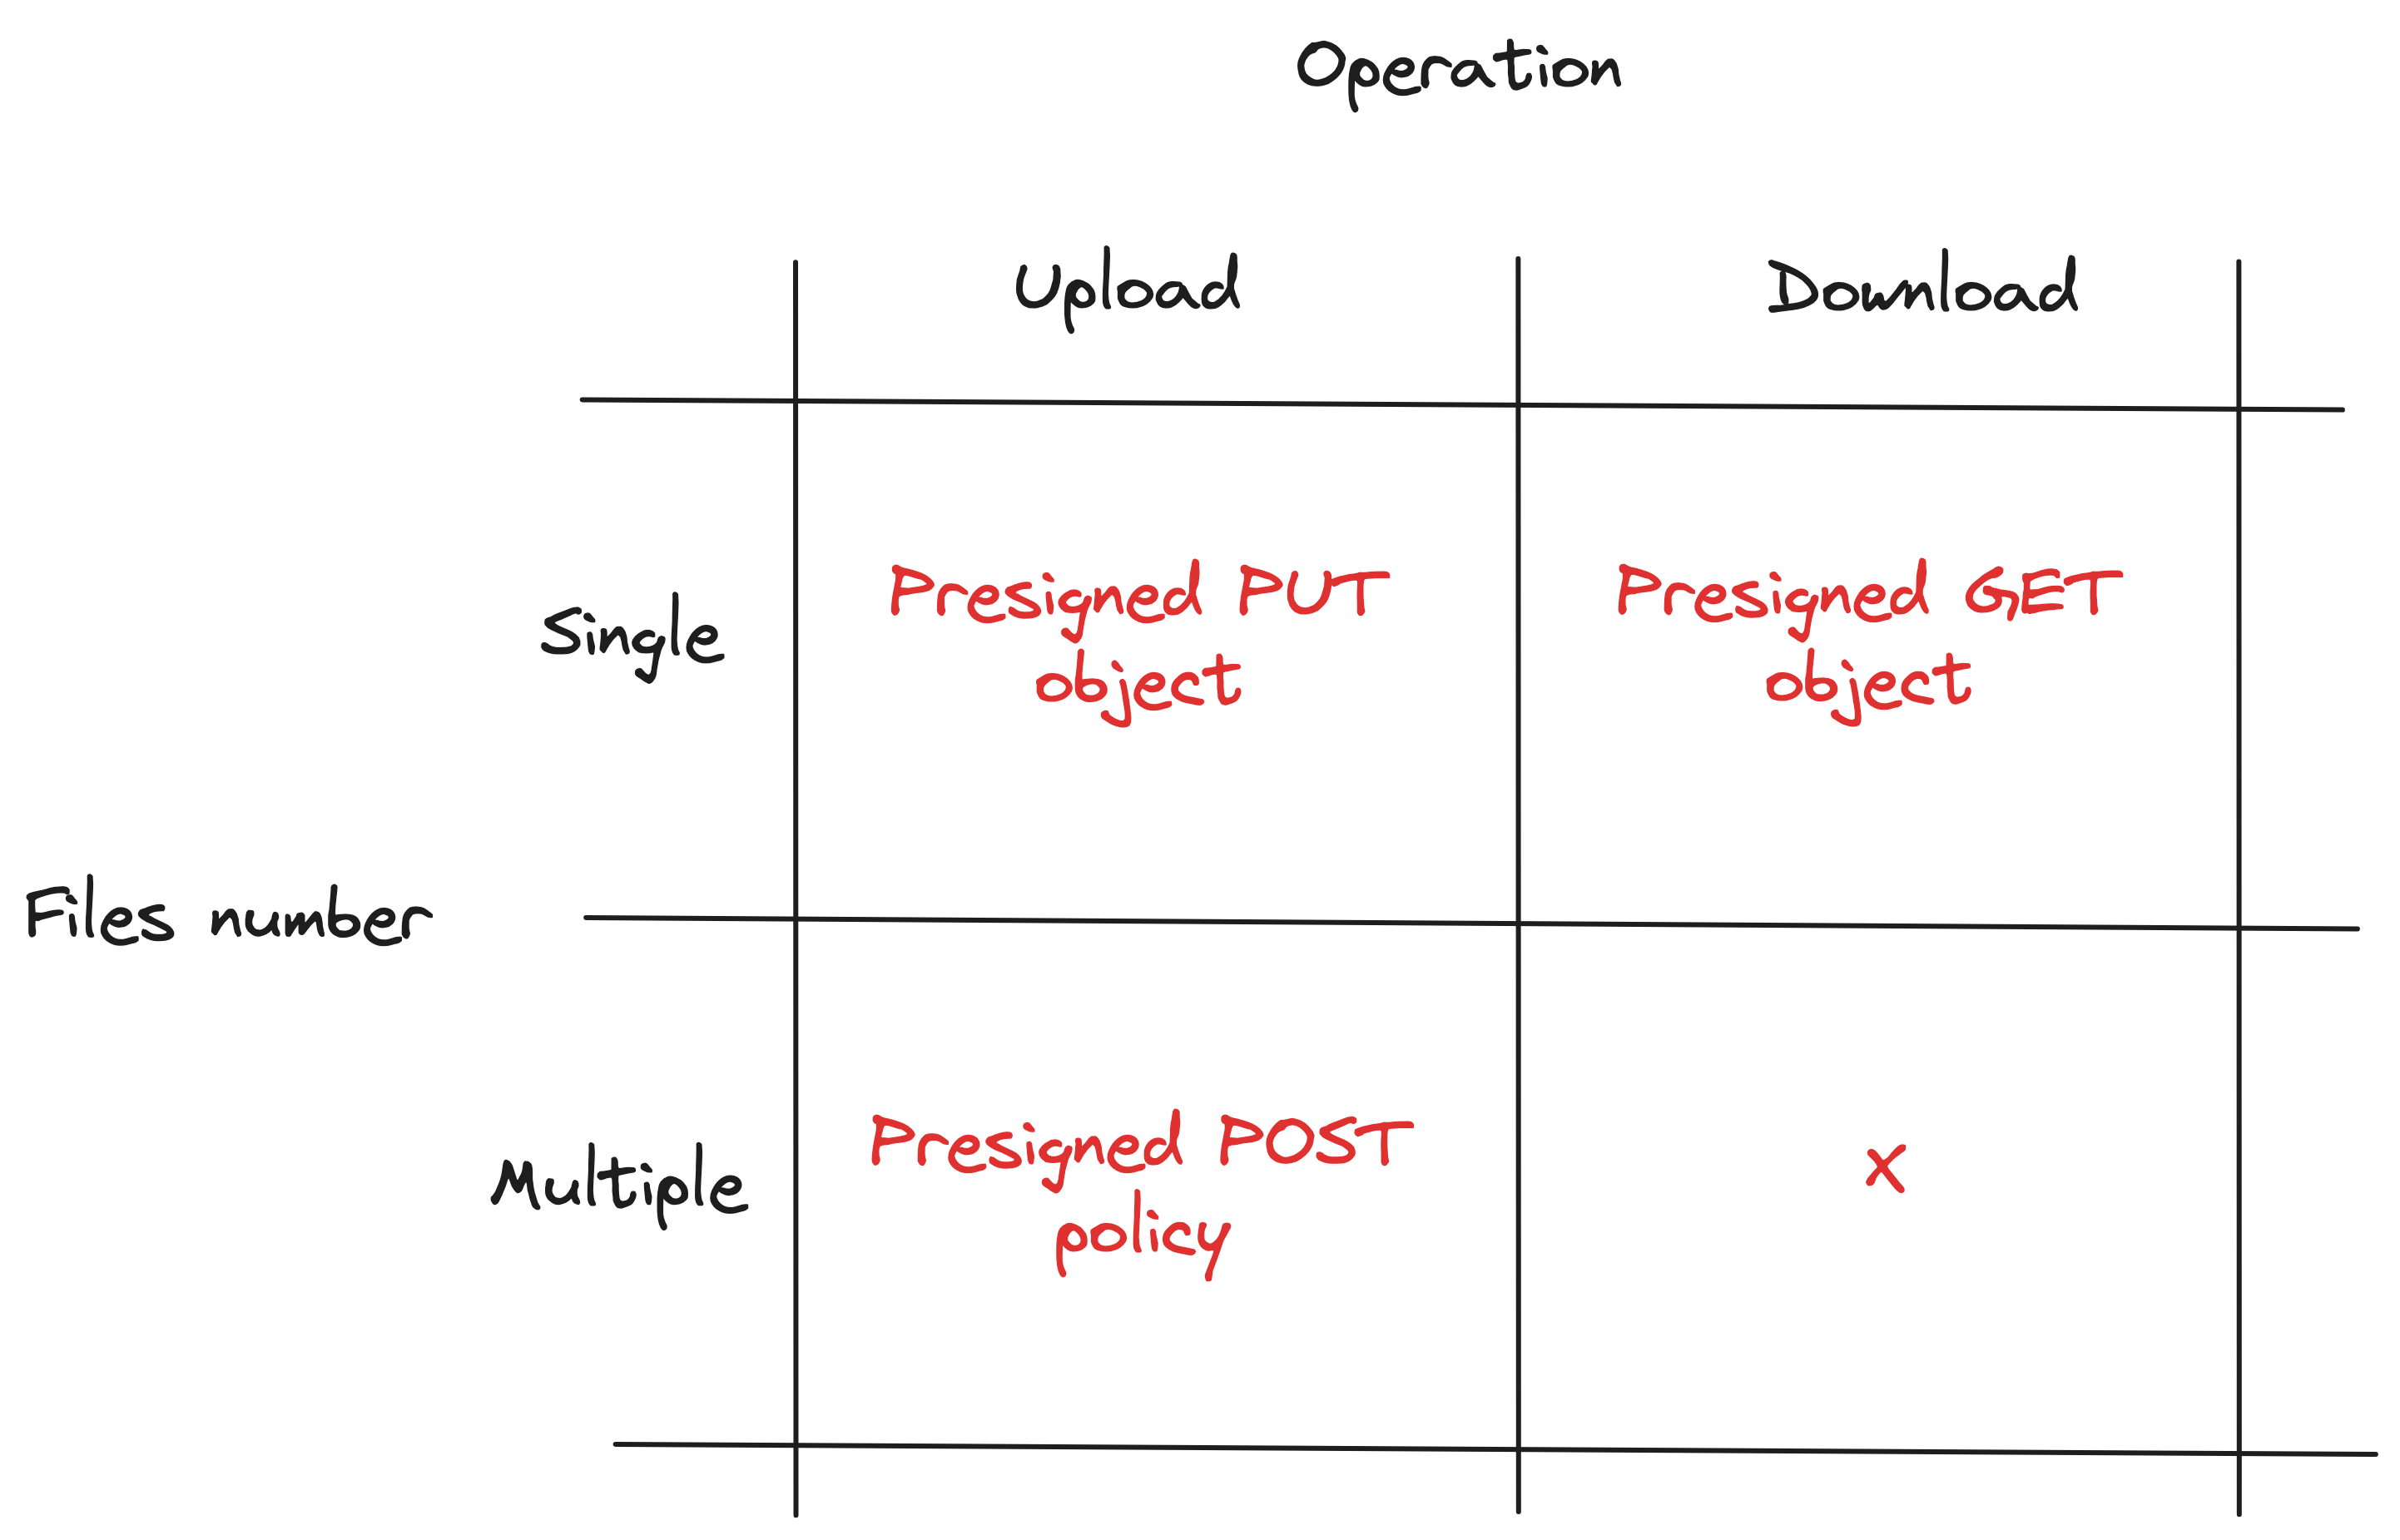
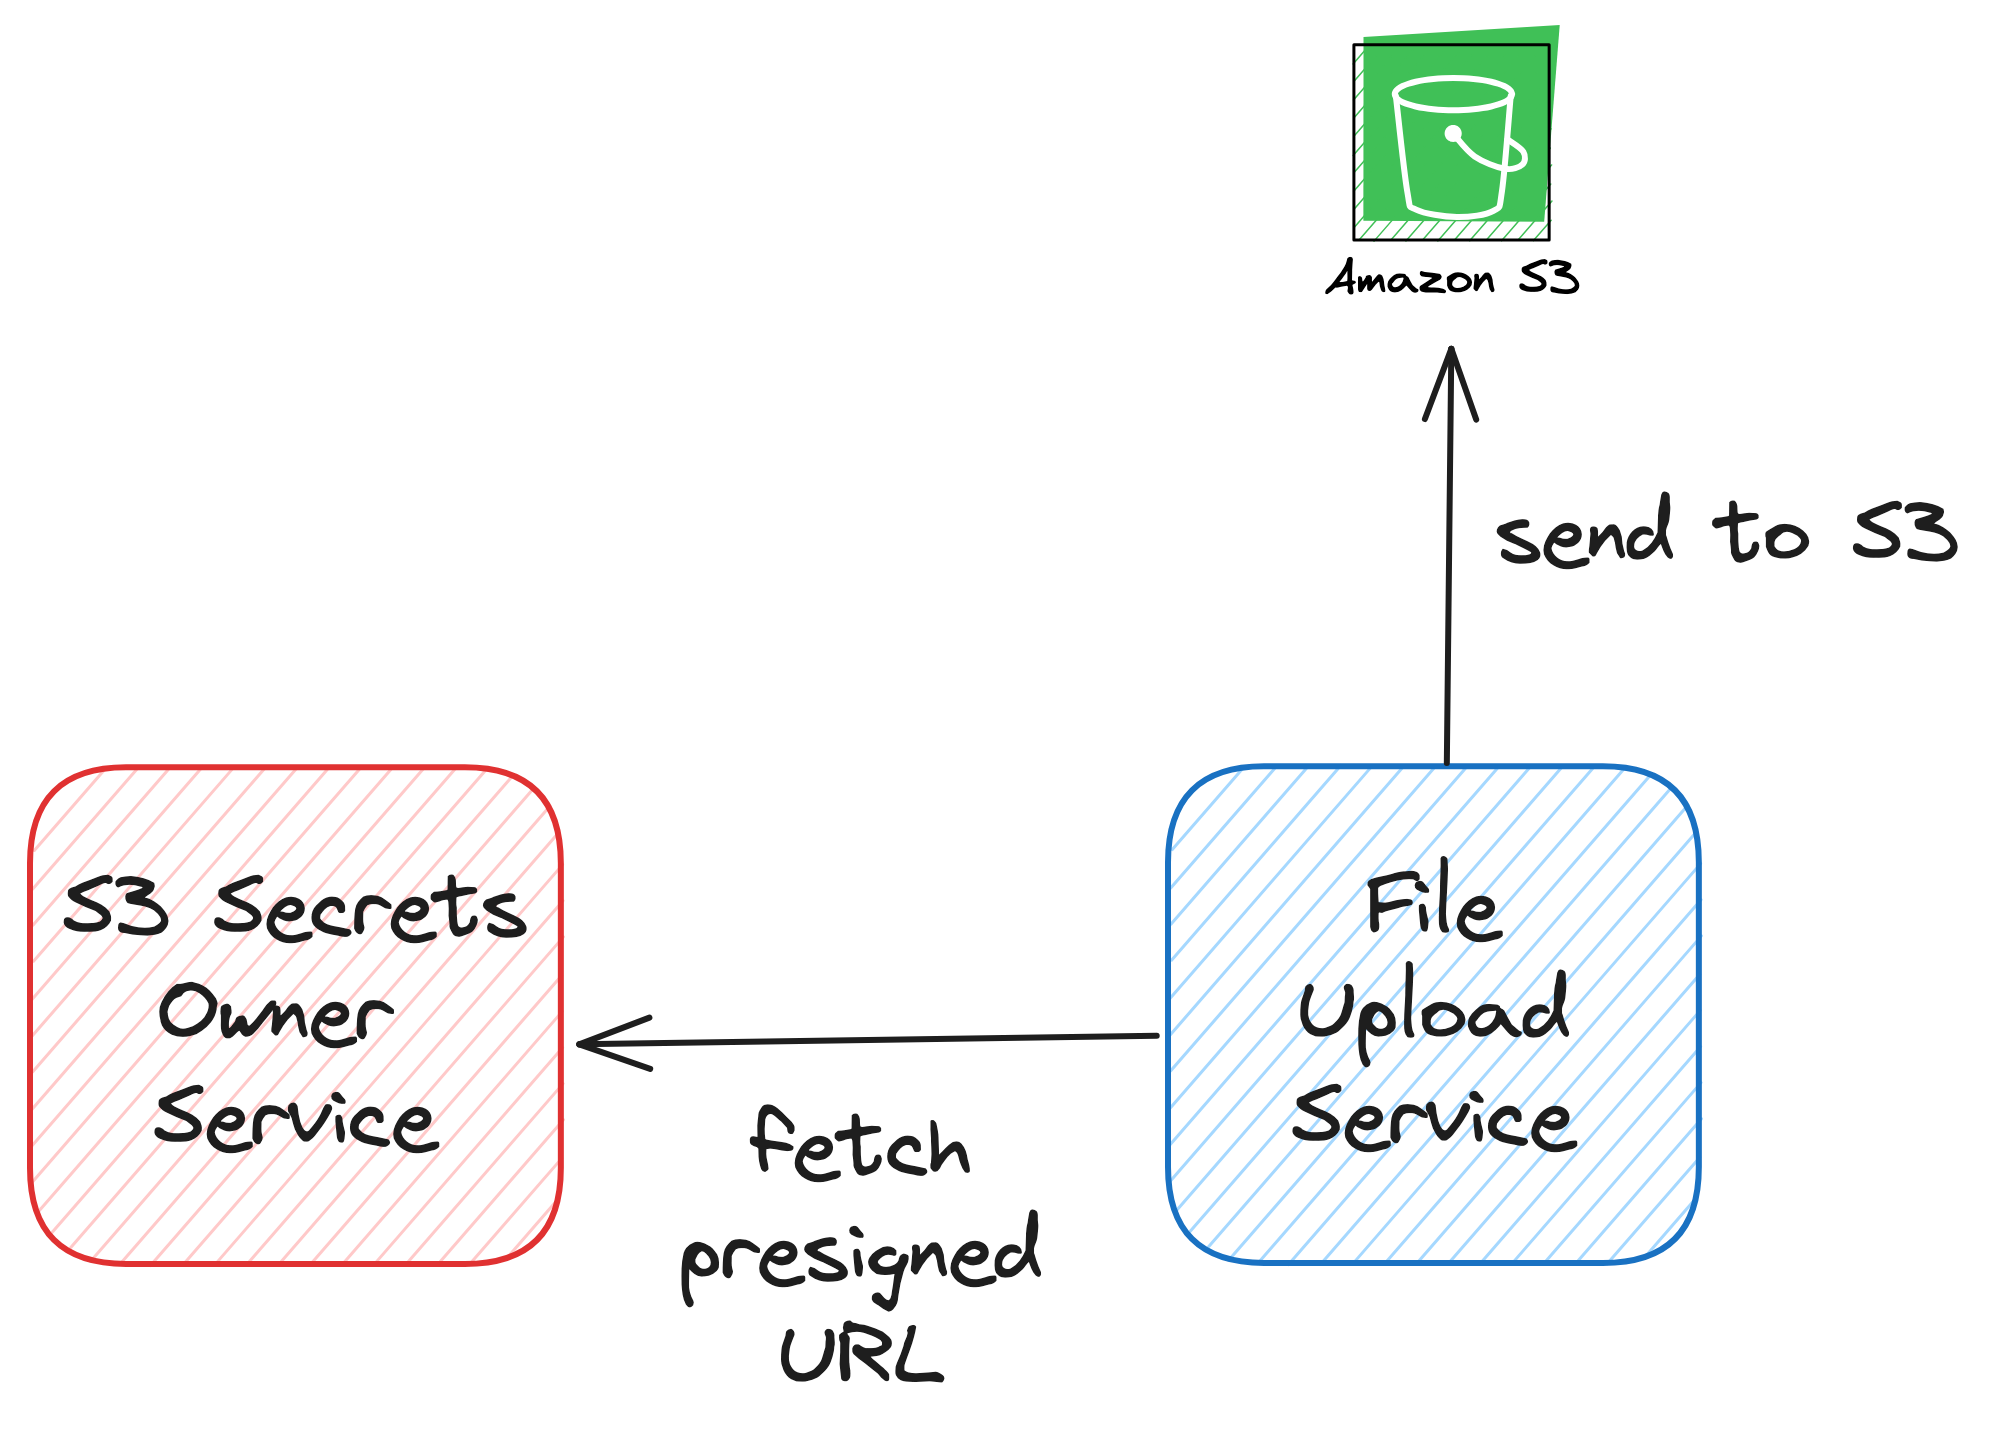
For downloading or uploading a single file, the pull-based architecture shines when the component requiring file uploads can dynamically request a presigned URL from an external service as needed.
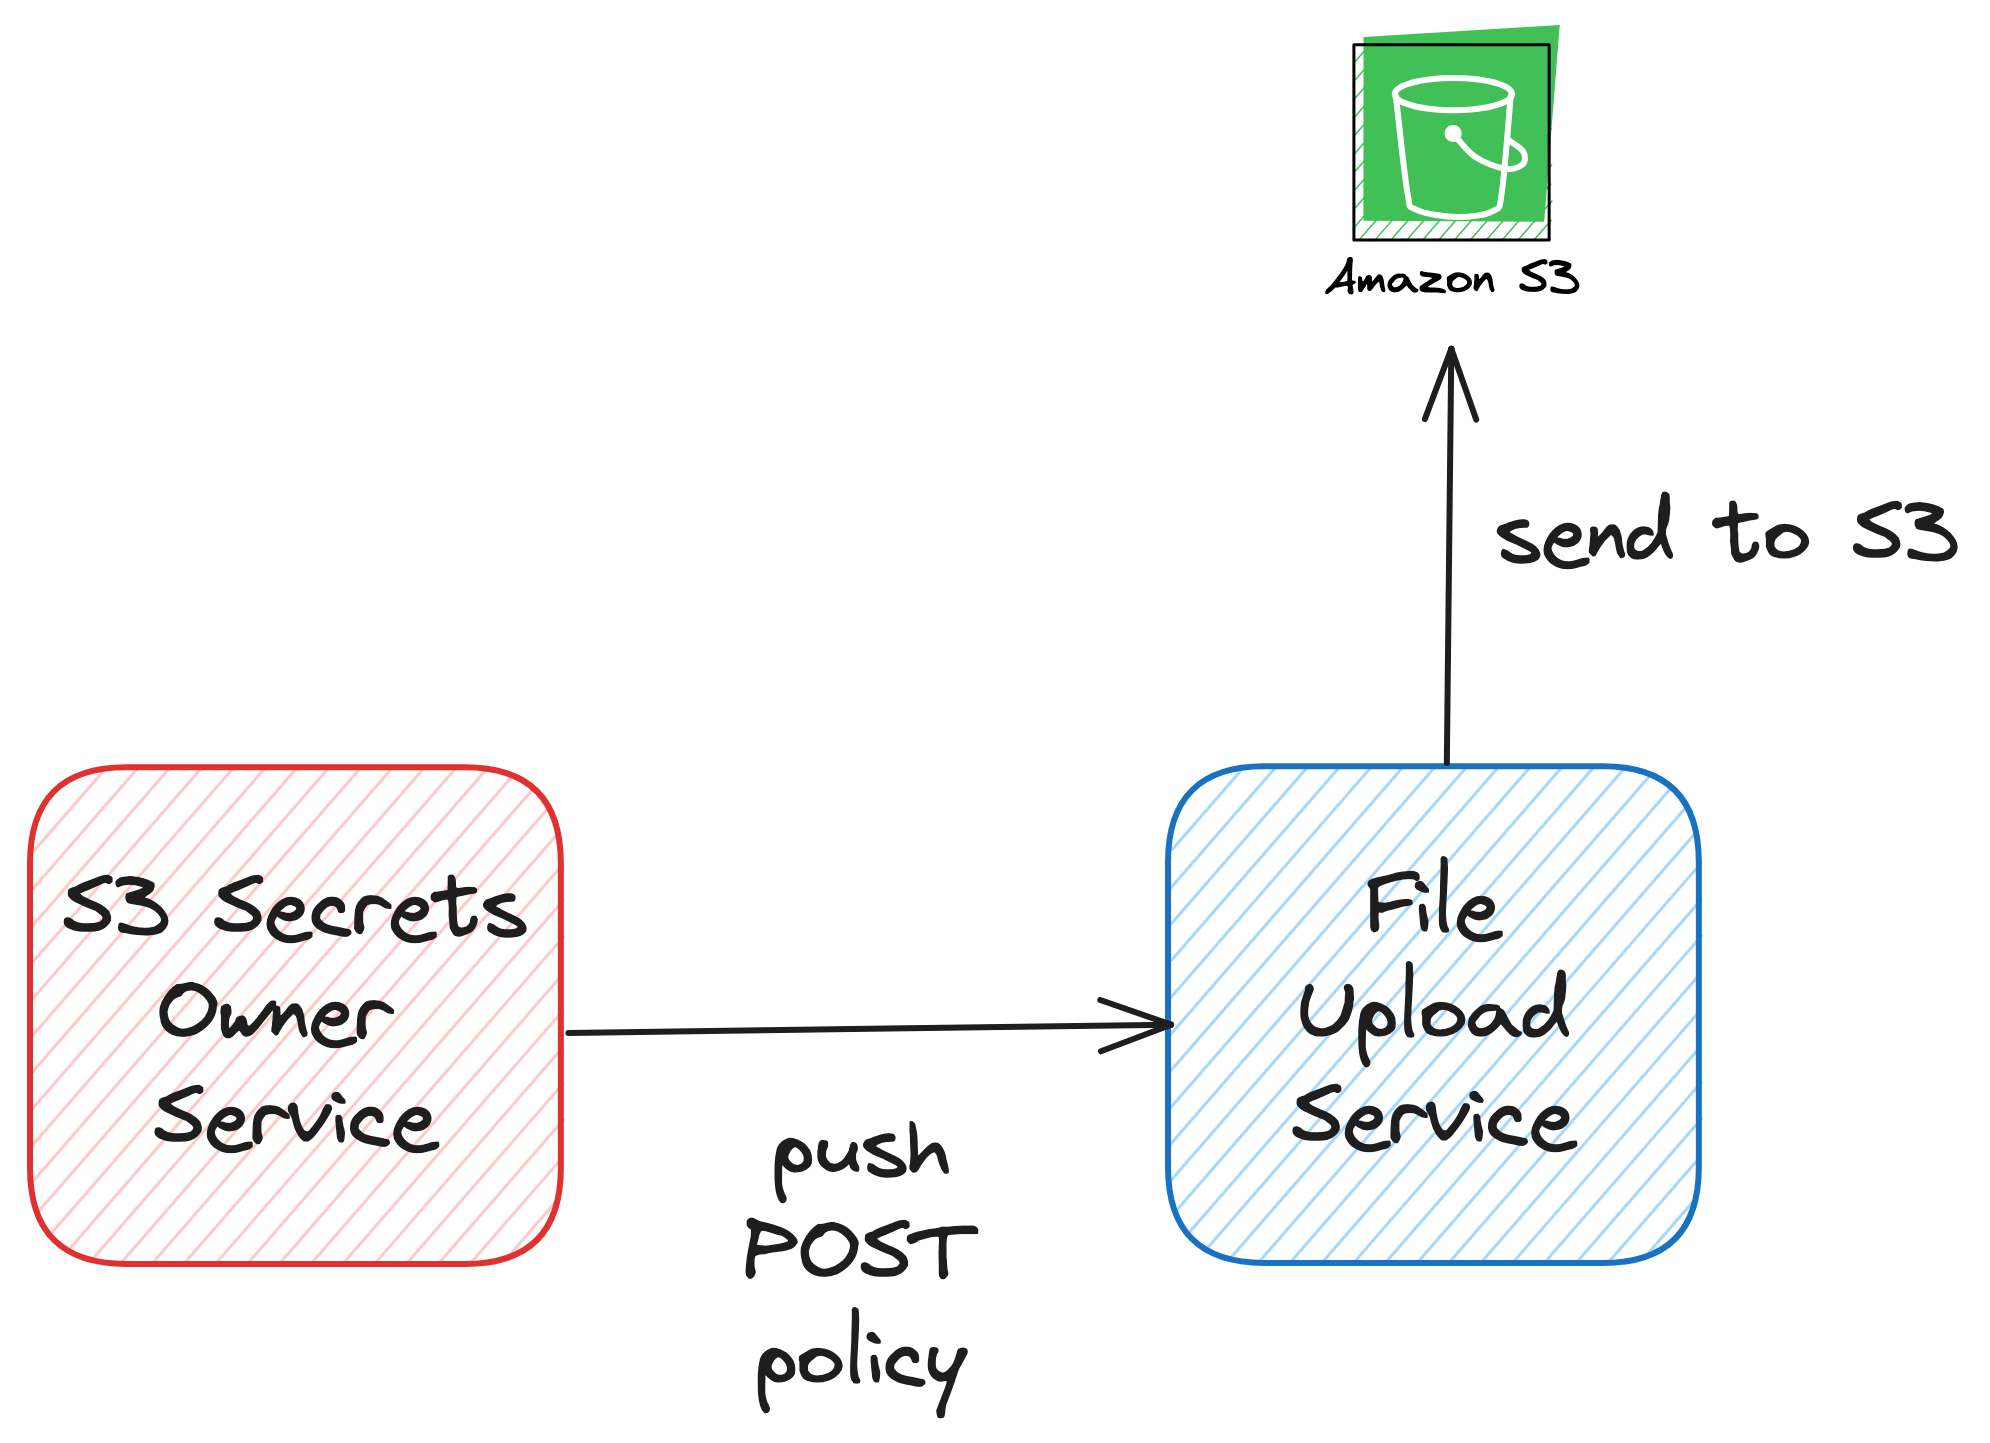
Conversely, for scenarios such as uploading using HTML form or running specific jobs within a virtual machine, a push-based approach presents a straightforward solution. Here, the initiation of the presigned POST policy aligns with the document creation or VM startup process. By injecting a policy during these events, we empower the source to autonomously upload files and minimize external dependencies.
How-to guide
We use the Python boto package to demonstrate how to generate and use presigned URLs. It provides an AWS S3 client with a simple interface.
import os

import boto3
from botocore.client import Config

ACCESS_KEY = os.getenv("ACCESS_KEY")
SECRET_KEY = os.getenv("SECRET_KEY")
region = "eu-central-1"

s3_client = boto3.client(
    's3',
    aws_access_key_id=ACCESS_KEY,
    aws_secret_access_key=SECRET_KEY,
    config=Config(signature_version='s3v4'),
    region_name=region,
)
Of course, we need also access to the AWS S3 cloud. I described how to create an IAM account and S3 bucket in one of the previous posts about automated testing AWS S3 uploads.
Presigned POST policy
In the presigned POST URL, we configure a policy that can be used to upload multiple files. We can define:
what S3 bucket files should land in -
bucket_namehow long the policy would be valid -
ExpiresInwhich additional form fields will be accepted -
Fieldsset of additional conditions -
Conditions(e.g. accepted extensions of the files, allowed prefix of the filenames)
In our example, we specify that the policy would expire in one minute (60 seconds) from creation time. Additionally, we allow only files that have a key starting with mytest/ string. In Amazon S3, a key (also referred to as an object name) serves as a unique identifier for an object within a bucket. It essentially represents the full path of the object within the bucket's namespace. This configuration permits uploading files to mytest folder in the testjorzel bucket.
import requests

bucket_name = "testjorzel"
prefix = "mytest/"
object_name = prefix + "${filename}"
presigned_post = s3_client.generate_presigned_post(
    bucket_name,
    object_name,
    Fields=None,
    Conditions=[["starts-with", "$key", prefix]],
    ExpiresIn=expiration,
)
Our presigned post policy should look something like that:
{
    'url': 'https://testjorzel.s3.amazonaws.com/',
    'fields': {
        'key': 'mytest/${filename}',
        'x-amz-algorithm': 'AWS4-HMAC-SHA256',
        'x-amz-credential': 'AKIAU5USI2VZ3RIF3L5V/20240403/eu-central-1/s3/aws4_request',
        'x-amz-date': '20240403T201346Z',
        'policy': 'eyJleHBpcmF0aW9uIjogIjIwMjQtMDQtMDNUMjE6MTM6NDZaIiwgImNvbmRpdGlvbnMiOiBbWyJzdGFydHMtd2l0aCIsICIka2V5IiwgIm15dGVzdC8iXSwgeyJidWNrZXQiOiAidGVzdGpvcnplbCJ9LCBbInN0YXJ0cy13aXRoIiwgIiRrZXkiLCAibXl0ZXN0LyJdLCB7IngtYW16LWFsZ29yaXRobSI6ICJBV1M0LUhNQUMtU0hBMjU2In0sIHsieC1hbXotY3JlZGVudGlhbCI6ICJBS0lBVTVVU0kyVlozUklGM0w1Vi8yMDI0MDQwMy9ldS1jZW50cmFsLTEvczMvYXdzNF9yZXF1ZXN0In0sIHsieC1hbXotZGF0ZSI6ICIyMDI0MDQwM1QyMDEzNDZaIn1dfQ==',
        'x-amz-signature': '672ca05236f727190841b102a73e4d3298b5821b5afbc62cbfba2dad6128c74c'
    }
}
It consists of a generic URL and a set of authentication fields that should be passed with a POST request (requests.post function).
import requests
def upload_file(filepath, object_name, policy):
    with open(filepath, 'rb') as f:
        files = {'file': (filepath, f)}
        fields = policy['fields']
        fields['key'] = object_name
        http_response = requests.post(policy['url'], data=fields, files=files)
    print(f'File: {object_name} uploaded, HTTP status code: {http_response.status_code}, text: {http_response.text}')

filepath = "test.txt"
upload_file(filepath, 'mytest/post_test1.txt', presigned_post)
upload_file(filepath, 'mytest/post_test2.txt', presigned_post)
The test.txt file is a simple text file consisting of a single line: My test put/get/post. If the POST request is successful, the result should be a 204 response code without content. It means that files were successfully uploaded.
File: mytest/post_test1.txt uploaded, HTTP status code: 204,
text:

File: mytest/post_test2.txt uploaded, HTTP status code: 204,
text:
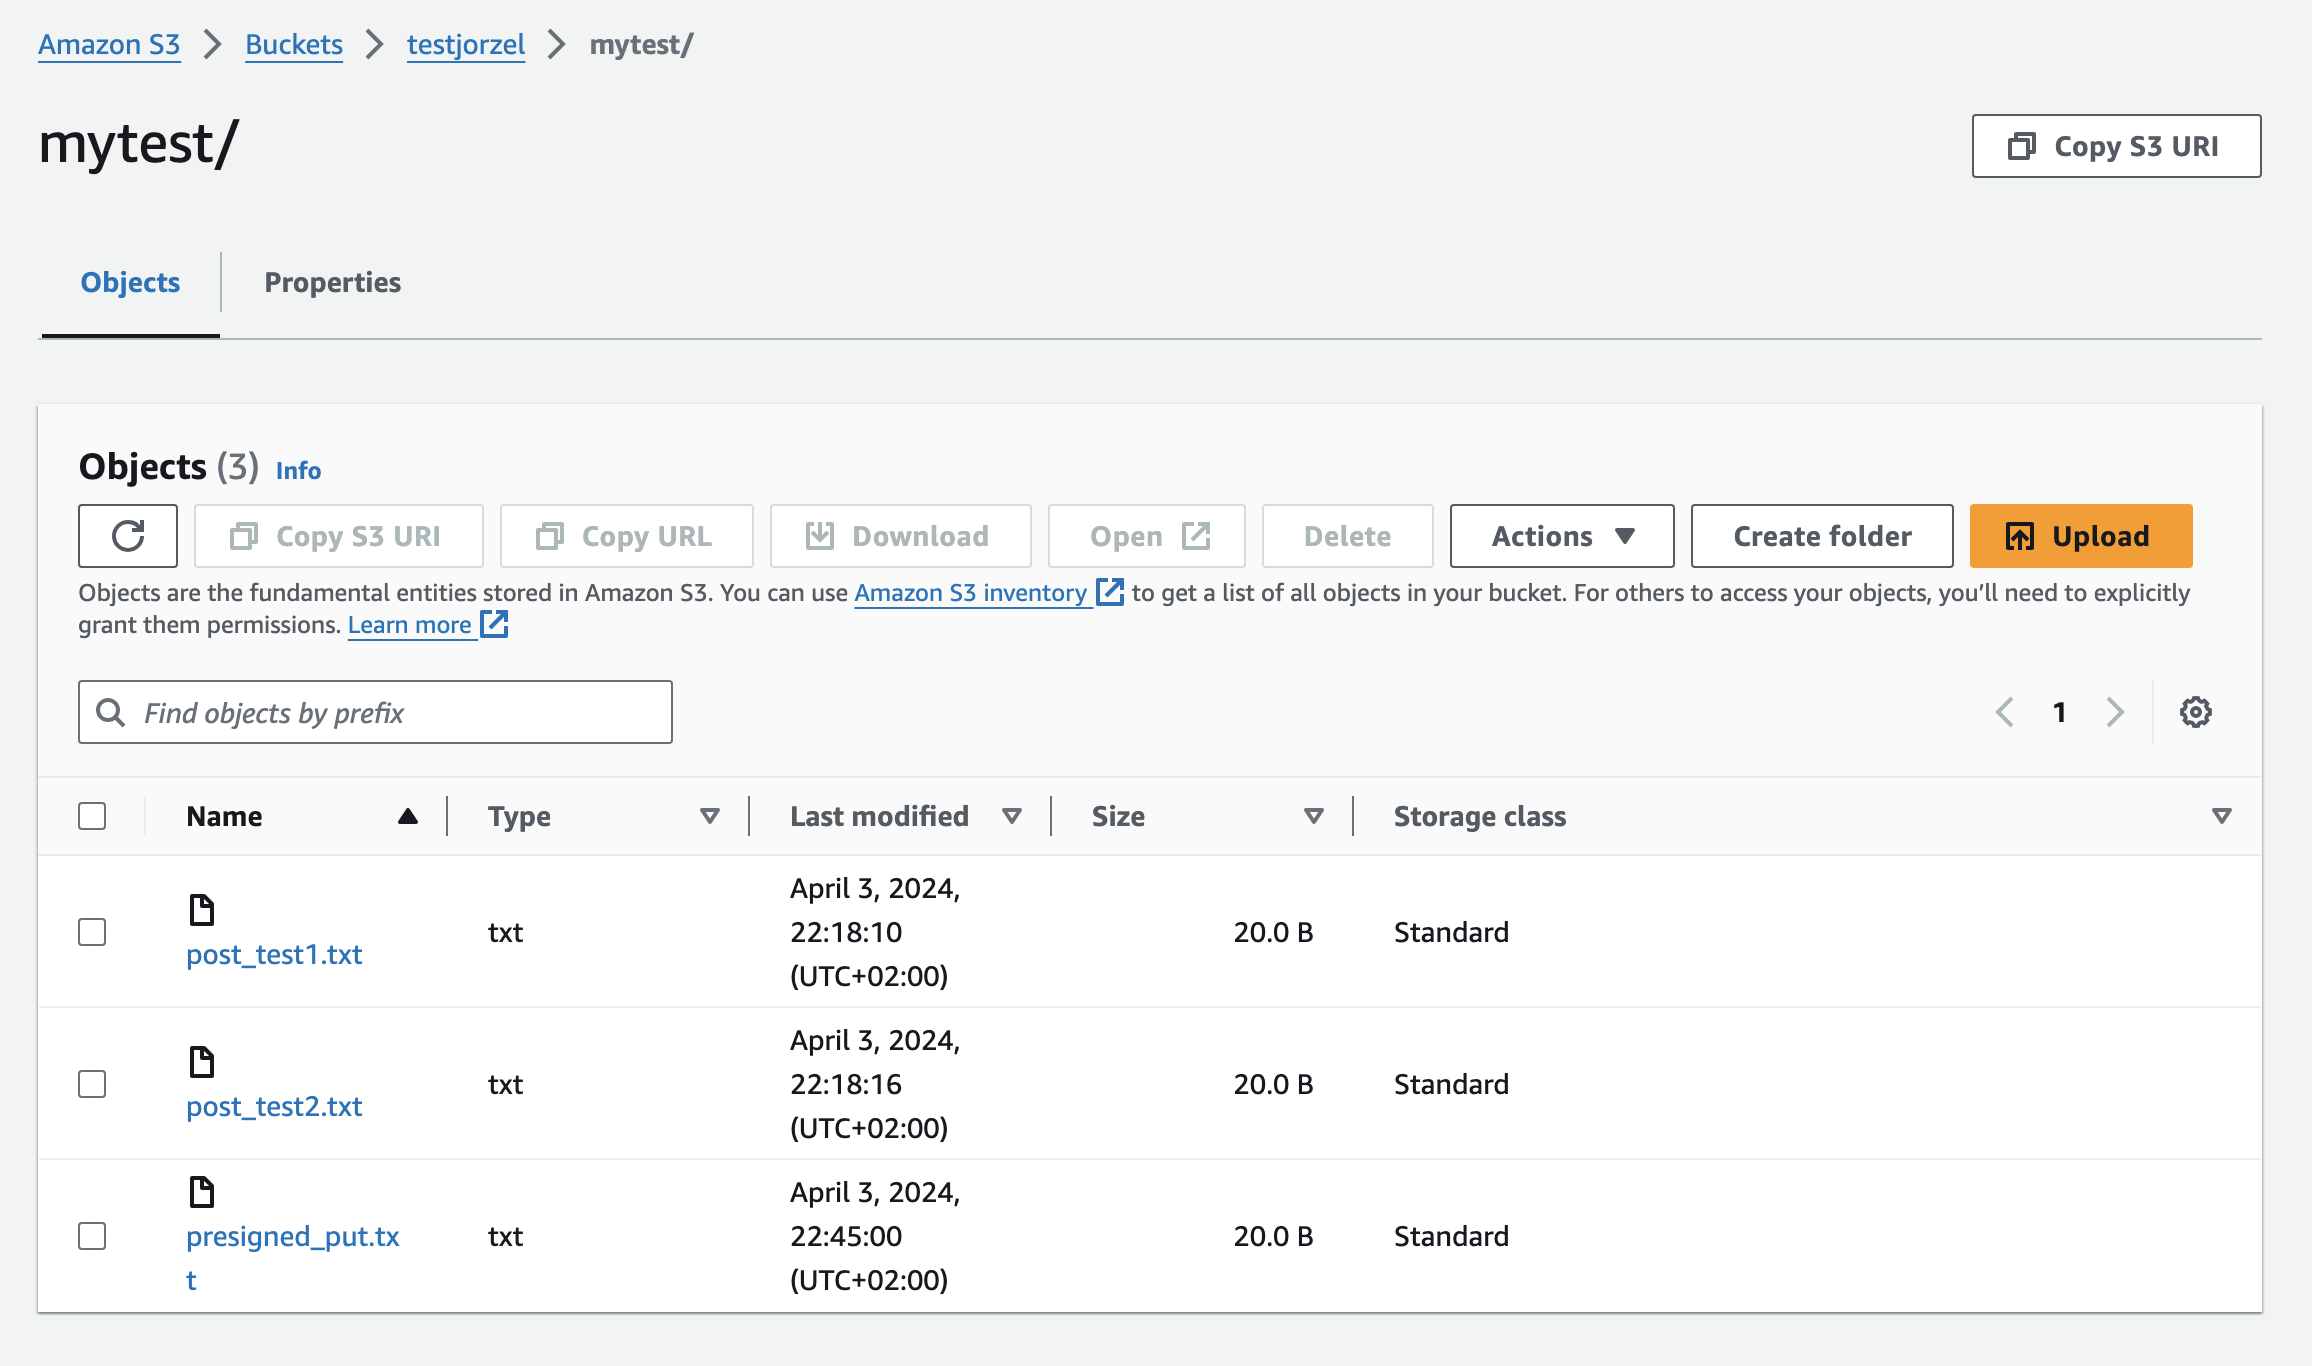
We can check the content of our bucket testjorzel in S3 cloud.

Files post_test1.txt and post_test2.txt successfully landed in testjorzel bucket within the mytest folder.
We can now check what happens when a request violates the presigned policy. If the expiration time elapsed, we would get the response with an error message: Invalid according to Policy: Policy expired.
File mytest/post_test3.txt uploaded, HTTP status code: 403,
text: <?xml version="1.0" encoding="UTF-8"?> <Error><Code>AccessDenied</Code><Message>Invalid according to Policy: Policy expired.</Message><RequestId>3GZ7Q2XYK4R9190H</RequestId><HostId>CAL0rRroo8PjDPvXEKhAa5XB/FKwf0k+dm00Kwr95ri2yaN+Hr/qZgzmnH4Fs/Jmnt45rMBidY8=</HostId></Error>
If we try to change the prefix of the uploaded key, we will get: Invalid according to Policy: Policy Condition failed: ["starts-with", "$key", "mytest/"] error:
File test/post_test4.txt uploaded, HTTP status code: 403,
text: <?xml version="1.0" encoding="UTF-8"?>
<Error><Code>AccessDenied</Code><Message>Invalid according to Policy: Policy Condition failed: ["starts-with", "$key", "mytest/"]</Message><RequestId>4AKJZREYX4YD17VF</RequestId><HostId>WLz45xZYd7dSgSIi/6SWtWuzPPYF2aCI1oeX8P+RxTdFskeAM6c7g0VH0OwJRVDIEBSmUS8qDnw=</HostId></Error>
Presigned URL for GET
Assuming that we have a file in S3 bucket (e.g. post_test1.txt ), we can generate a presigned GET URL.
bucket_name = "testjorzel"
prefix = "mytest/"
presigned_get = s3_client.generate_presigned_url(
    'get_object',
    Params={
        'Bucket': bucket_name,
        'Key': "mytest/post_test1.txt"
    },
    ExpiresIn=60,
)
The generated URL should be a string with some additional fields in the query string:
https://testjorzel.s3.amazonaws.com/mytest/post_test1.txt?X-Amz-Algorithm=AWS4-HMAC-SHA256&X-Amz-Credential=AKIAU5USI2VZ3RIF3L5V%2F20240403%2Feu-central-1%2Fs3%2Faws4_request&X-Amz-Date=20240403T203856Z&X-Amz-Expires=60&X-Amz-SignedHeaders=host&X-Amz-Signature=25b531d9eb1ed01afcaaa1ce61fddf36720833e04a239d0ab0c6fa78ce308fa1
We can use it to download the file (by execution request.get).
import requests

def download_file(url):
    response_get = requests.get(url)
    print(f"Download, HTTP code: {response_get.status_code}, content: '{response_get.text}'")
    with open("presigned_get.txt", mode="wb") as file:
        file.write(response_get.content)

download_file(presigned_get)
The file should be saved on our disk under presigned_get.txt name and the response should look as follows:
Download, HTTP code: 200, content: 'My test put/get/post'
Presigned URL for PUT
The last case is generating a presigned PUT URL to upload a single file (under key: mytest/presigned_put.txt). It will be similar to GET one.
bucket_name = "testjorzel"
prefix = "mytest/"
presigned_put = s3_client.generate_presigned_url(
    'put_object',
    Params={
        'Bucket': bucket_name,
        'Key': prefix + "presigned_put.txt"
    },
    ExpiresIn=60,
)
The presigned_put will also be a string:
https://testjorzel.s3.amazonaws.com/mytest/presigned_put.txt?X-Amz-Algorithm=AWS4-HMAC-SHA256&X-Amz-Credential=AKIAU5USI2VZ3RIF3L5V%2F20240403%2Feu-central-1%2Fs3%2Faws4_request&X-Amz-Date=20240403T204459Z&X-Amz-Expires=60&X-Amz-SignedHeaders=host&X-Amz-Signature=ed117f655fc007d1572618474b9fc96f1a1820ec705317a6954c6a78730fd769
Now we can upload a file using requests.put function.
import requests

filepath = "test.txt"

def upload_file(filepath, presigned_put):
    with open(filepath, 'rb') as f:
        response_put = requests.put(presigned_put, data=f)
        print(f"Upload, HTTP code: {response_put.status_code}, content: '{response_put.text}'")

upload_file(filepath, presigned_put)
The response should be:
Upload, HTTP code: 200, content: ''
The file can be found in the testjorzel bucket.
Conclusion
In this short guide, we explored the versatility of presigned URLs in Amazon S3, showcasing their usage through practical examples implemented in Python. They are particularly useful in scenarios where you want to enable file uploads or downloads from S3 without embedding AWS credentials in your application or sharing your sensitive AWS credentials with users.
The short codebase covering the topic can be found here.


